| PRODUCT INFORMATION
Click
BioDesignGelWrap
BioDesignDialysis
Tubing
CellMicroSieve
Leveling
Platform
BioPrepNylon
Well Reader
BioDesignGelFile
SPECIAL
OFFERS
ORDERING
INFORMATION
HOME PAGE
PRODUCT INFORMATION
Click
BioDesignGelWrap
BioDesignDialysis
Tubing
CellMicroSieve
Leveling
Platform
BioPrepNylon
Well Reader
BioDesignGelFile
SPECIAL
OFFERS
ORDERING
INFORMATION
HOME PAGE |
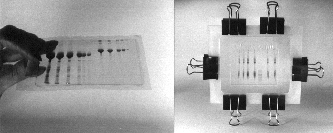
BioDesignGelWrapTM -
Instructions for Gel Drying
Polyacrylamide and agarose gel drying has never been
easier than with BioDesignGelWrap. Your gels will be dried quickly through the
BioDesignGelWrap membrane, which forms a tough and flat envelope around your gel that will
be stable for years. To insure a perfectly dried gel, please follow these simple
directions:
- Cut two pieces of BioDesignGelWrap the same size as your
BioDesignGelFrame.
- Wet the BioDesignGelWrap in a small amount of water.
BioDesignGelWrap wets instantly and will become slightly opaque. Never soak for more than
one minute, as excessive wetting will cause poor results. BioDesignGelWrap cannot be
stored wet.
- Place one piece of the wet BioDesignGelWrap on the solid
BioDesignGelFrame bottom section and push out the air bubbles underneath it using the side
of your hand. Pour a small amount of water (10 to 20 ml) on top and then lay your gel
down. Try to have as few as possible air bubbles trapped beneath your gel. Then pour
another small volume of water on top of your gel. Place the second wet piece of
BioDesignGelWrap down. Use the side of your hand to push out the bulk of the trapped
air bubbles.
- Place the open picture frame part of the BioDesignGelFrame
on top and use the clamps, included with the BioDesignGelFrame, to secure all four sides.
- Shake the assembled BioDesignGelFrame upside down, to
remove any excess water.
- Leave the frame horizontal while drying. With lower
percentage polyacrylamide gels, you can air dry overnight. For polyacrylamide gels
that are over 10%, 1 mm thick, gradient, or larger than 10 x 10 cm, use the BioDesign
Lamp. The lamp uses a 60 or 75 watt light bulb (not included) and should be
positioned 3 inches away from the gel surface.
- When your gel is dry, it and the BioDesignGelWrap will be
completely clear and flat. Disassemble the BioDesignGelFrame.The BioDesignGelWrap located
at the edges, which was between the two pieces of the frame, will still be damp and
must be cut away with a scissors. With thicker gels, it is sometimes necessary to press
the dried gel overnight to prevent curling.
- That's it ! BioDesignGelWrap has formed a flat tough
transparent envelope around your dried gel and is stable for years.
Helpful Hints:
- Easy Record Keeping: Place a paper label with run date, sample data, etc. between the
pieces of BioDesignGelWrap. It will be sealed with your gel to provide a permanent record.
- Easy Storage: Once dried with BioDesignGelWrap, your gels can be stored and organized in a
BioDesignGelFile. Your gels will remain flexible.
- Easy Photography: No more rushing to photograph wet gels. Your dried gels will be
completely transparent and the stain colors preserved, so you can photograph whenever
necessary.
Click here for
 |